In this post I’m going to show you how to make a 3 ingredient natural body butter with all natural ingredients that is not only easy to make, but the finished product will actually penetrate your skin quickly! My whipped DIY body butter recipe will relieve your dry skin and be easy to use.

Disclosure: This post contains affiliate links, meaning, at no additional cost to you, I will earn a small commission if you click through and make a purchase. Learn more
Remedying dry skin can be a full time job-nobody’s got 30+ minutes to wait for their homemade body butter to absorb! I’m guessing we’ve all been there-waiting and waiting to put your pants on but your DIY moisturizer is just sitting on top of your skin? Whether you’ve dabbled in making your own products with diy recipes or consider yourself a DIY beauty pro, I bet you’ve made a body butter or homemade lotion bars and found it oh so discouraging when you realize it is too greasy to be functional.
Why is My Homemade Body Butter so Greasy?
This is actually the second fast absorbing body butter recipe I’ve attempted. I got a bit ambitious with a different recipe and tried to tint it pink with hibiscus. Brilliant idea (if I do say so myself :)) but it didn’t work as well as I had hoped. I say I “attempted” because I added shea butter to make it extra nourishing and found that shea butter rendered the DIY a bit too greasy. While the original DIY body butter recipe is somewhat fast absorbing-it’s not as fast as today’s new recipe!
You might be tempted to use ingredients like grapeseed oil, organic coconut oil, olive oil, cocoa butter, shea butter, jojoba oil, sweet almond oil etc. I don’t recommend any of these common ingredients because they will give your diy body butter a greasy feel. All the oils I mention have a very slow absorption rate.
BONUS: A little trick that will help relieve greasiness is adding arrowroot powder (or tapioca starch) to your body butter. It is a light powdery substance with no smell. Adding just a small amount can make a big difference when it comes to keeping that “greased pig” feeling at bay!
More Body & Face DIYs for Dry Skin
- DIY Dry Skin Mask
- Apricot Myrrh Stick
- DIY Dry Skin Roll On
- Dry Skin Moisturizer with Shea Butter
- 3 Remedies for the Dry Skin Blues
- coQ10 Sea Buckthorn Facial Oil
- Firming Eye Serum w/Rose & Kokum
Is Homemade Body Butter Good for your Skin?
DIY Body Butter is a fantastic option for relieving dry skin. Making a DIY body lotion contains about 50% of water. Plus, lotions take much more time to make and they require a preservative. A DIY body oil is a great option but you don’t get the benefit of a butter since a butter is solid.
A body butter is pretty easy to make, not diluted with water and thoroughly moisturizing. You can’t beat it when it comes to the amount of emollient moisture your skin will get from a body butter.
How Do I Make My Own Body Butter?
Making a body butter requires you to gently heat all your ingredients (minus delicate ingredients like essential oils and vitamin E) together. Once they are liquified, you can simply pour them into a glass container, allow to cool and then use! Some DIYers like to whip their body butter which makes it a bit softer, lighter and easier to use. This requires you to use a mixer, wait until the oils have cooled just a bit and than whip as you would if you were making a whipped cream. However, whipping is not necessary and can be skipped.
To get started, you must pick a carrier oil and preferably one that is known for quick absorption. These light oils are amazing at moisturizing your skin and have become regulars in many of my other homemade beauty products.
Next, you must find a butter that is right for your needs. I find cocoa butter and shea butter much too greasy. Kokum butter might be a good choice but I can’t say for sure. For this recipe, since we are wanting a butter that absorbs quickly, Mango butter is the perfect choice. It is a butter that has all the emollient benefits of the other butters but absorbs so quick, you won’t believe it!
Homemade Body Butter Ingredients List:
Hazelnut Oil is great for oilier skin types and absorbs quickly. It is very gentle and would be great for sensitive skin types as well. It has amazing astringent properties and is hydrating and balancing!
Baobab Oil has one of the fasted absorption rates of carrier oils. It is extremely high in antioxidants which makes it a great addition to a body oil. It’s also very high in vitamins A, C & E and essential fatty acids.
Mango Butter absorbs into the skin “shockingly fast”. This is a plus since butters tend to be greasy. This different butter is also non-comedogenic so it is safe for oilier skin types since it won’t clog pores! It’s beneficial properties include vitamin A and C which we know are both beneficial when it comes to keeping the skin looking youthful. It also has been known to be helpful in repairing cracked skin from dryness. Mango butter is the main ingredient in this DIY body butter recipe.
Arrowroot Powder is optional. I wish I had had enough ingredients to make 2 butters-1 with arrowroot and 1 without. I made mine with arrowroot and can say that this body butter absorbs in less then a minute. However, common sense tells me that a butter without it would be more hydrating. Since I’ve chosen 2 very fast absorbing ingredients, I personally don’t think the arrowroot is necessary.
Essential oils are optional. I did not add any to mine but lavender essential oil is always a good idea! Chamomile is very calming and healing and smells great with lavender or on it’s own. Add your favorite essential oils and skip synthetic fragrances.
How Long Does Homemade Body Butter Last?
The shelf life of body butter, as long as it contains only oil based ingredients is around 6 months. There is no preservative required.
Oils and butters last quite a while. Typically, they last 6 months or more. The problem arises when you mix water based ingredients with oils. Bacteria forms in water rather quickly and can cause your DIY creation to go bad in days.

What You’ll Need to Make DIY Body Butter:
- 3 TBSP. Hazelnut Oil (find it HERE)
- 3 TBSP. Baobab Oil (find it HERE)
- 6 TBSP. Mango Butter (find it HERE)
- 1 TBSP. Arrowroot Powder (find it HERE) *optional*
- 10 drops Essential Oils (find it HERE) *optional*
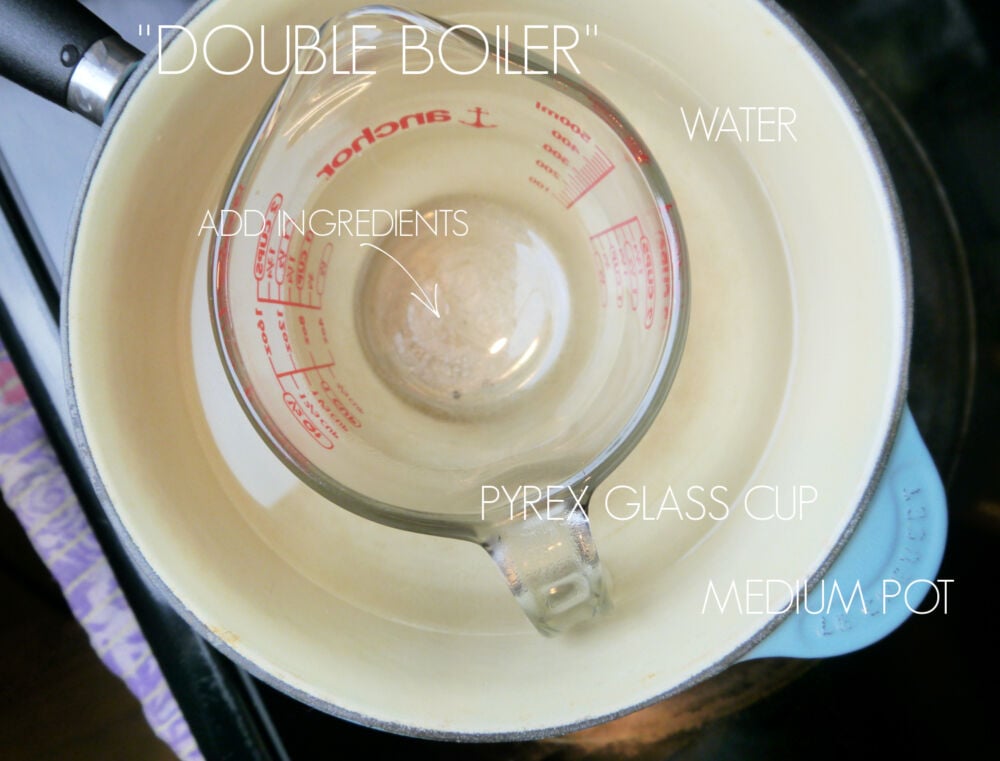
- Medium size pot
- Glass pyrex measuring cup (2 or 4 cup)
- Stick mixer or stand mixer
- 2 4 ounce glass jars or 1 8 ounce glass jar.

Homemade Fast Absorbing Body Butter
Are you tired of making balms and butters only to have them set on your skin and not soak in? I have chosen specific ingredients that are known for their fast absorption rates. This DIY Body Butter recipe will give you a silky moisturizer that will nourish your skin without leaving you greasy!
Ingredients
- 3 TBSP. Hazelnut Oil
- 3 TBSP. Baobab Oil
- 6 TBSP. Mango Butter
- 1 TBSP. Arrowroot Powder *optional*
- 10 drops Essential Oils *optional*
Instructions
- Fill a pot half way full with water and place on the stove top.
Add your oil and butter in a glass pyrex measuring cup and place in the pot. - Turn the stove top to medium heat.
- Allow the butter to melt than remove from the stove top.
- Depending on your mixer and the size of your measuring cup, you might need to pour your mixture into a larger mixing bowl. I don't because I use a stick mixer. I do have some splatters but I'd rather clean up splattering then deal with an extra bowl to clean. You can use a Kitchen Aid or a hand mixer if you chose.
- Allow your mixture to cool enough that it starts to harden. This takes about 10 minutes.
- Mix until butter starts to look like whipped cream.
- Add essential oils and mix again for about 1 1/2 minutes.
- Spoon into a glass container and enjoy!
Notes
In cooler temperatures your body butter will tend to harden quite a bit. In warmer temps, you will have a softer butter. The consistency matters none when it comes to how quickly it absorbs and how well it moisturizes. A hard butter can be hard to spread on the skin but it is a lot less messy.
Since we are not adding any water based products, this whipped body butter recipe does not need a preservative and has a shelf life of about 6 months.
Be careful to not expose your homemade body butter to direct sunlight .
Whipping a body butter can be tricky. You need to stay engaged until you have your final product. Depending on your mixer, you might be able to mix at different consistencies. My stick mixer isn't great at breaking through and whipping a hard balm so I have to monitor the softness and get it just right. For this reason, a stand mixer might work best for you.
There is no worry with ruining your body butter though. If you need to remelt you can. In fact, you might be able to skip the mixing all together and just have a balm. I don't believe skipping the mixing would leave your butter too hard to scoop.
This recipe makes a little less than 1 cup.

Where to Find Quality Ingredients:
The ingredients needed to make a fast absorbing body butter are unique and can be harder to find. I got all of my ingredients from Mountain Rose Herbs. They offer mostly organic, high quality ingredients including essential oils. They have many different sizes in each oil or butter so you don’t have to buy huge bottles that you’ll never finish. Each ingredient is linked for your convenience. I am an affiliate of Mountain Rose Herbs and will be a small commission if you buy through my links.
I linked Amazon Prime for glass jars but if you don’t need 1 day shipping, I really like getting my bottles from Specialty Bottle. Instead of buying 12 at a time, you can buy 1 at a time and they have a great variety of glass bottles and jars. The jar pictured is a flip top 6 ounce glass jar from Hobby Lobby.
I feel like I post several homemade lotions every year about this time. Where I live, we’ve had 1 or 2 warm days where I’ve had to pull out the dreaded shorts and holy hell are my legs white and dry. I’ll get some color eventually but dry, ashy winter skin just won’t do and it’s time to play catch up hydrating my skin! I’m betting I’m not the only one who does this!
Making your own natural products not only lets you customize and control the ingredients you choose, it also allows you to keep synthetic personal care products far away from your skin. For more homemade skincare recipes, check out my body product recipe list.
I must mention that this whipped body butter recipe is fantastic for preventing stretch marks during pregnancy.
This simple whipped DIY body butter recipe is easy to make, absorbs crazy fast and will hydrate skin just in time for warmer weather!
PIN IT!!!


Jennifer Phillips worked as a licensed aesthetician for over 8 years before creating the DIY skincare blog, Jenni Raincloud and her natural skin care line, J. Raincloud Organics. Jennifer has been blogging full time for 16 years and loves to gain and share knowledge on how to achieve beautiful skin the natural way.

love it, you are very talented–thank you!
Author
Christine-Thank you so much!
At what point do you mix the arrowroot powder in?
Author
Maureen-Good question-I totally didn’t add that. I mixed my arrowroot powder in while I was melting the oil and butters on the stove top. I’ll add that in-thanks for asking!!
Hi Jenni,
Can I use magnesium oil in place of one of the oils? I need to find a way to get a little magnesium into a butter I can use on my legs at night to help alleviate cramping without overdoing it.
Thanks,
Mia
Author
Hi Mia-I’ve never worked with topical magnesium so I’m not sure. I’ve heard magnesium oil can itch or sting so I wouldn’t no the amount you could use in order to avoid any discomfort. I would think the recipe would work find with magnesium oil-Most of my recipes work fine substituting any oils you have on hand. Let me know if you try it! I have wanted to use magnesium oil.
Mia~ I have been making my own “magnesium oil” for some time now, for the same reason~ terrible cramps in my feet & legs. It is simply magnesium flakes (I buy in an 8lb bulk bag from “Ancient Minerals” on Amazon) mixed with equal parts distilled water that is brought to a boil, then poured over the magnesium flakes & dissolved, cooled & poured into a spray bottle. So it’s not a thick, viscous “oil” persay, & is actually quite watery, so may not be a good mix-in for this recipe. You might consider dissolving the magnesium flakes into the warmed ingredients for this recipe, though I’m not sure they would dissolve at low temps. I use the mag spray at night, rubbing it in for a few minutes, then follow with body butter, as it prevents any itching or dryness from the magnesium. This works very well for me~ no more cramps! It even works if I forget & am in the midst of an awful cramp, though it takes about 10 minutes to fully subside the cramp. Hope this info is helpful to you. 💓🙋♀️Sammy in AZ
Samantha,
I will try using the spray followed by the body butter 🙂
Thank you!
Mia (Missing In Arizona)
Thank you SO MUCH for sharing this recipe Jennifer! I have been looking for one that does not use any water, & to be honest, I’d not come across one using hazelnut oil & baobab~ yet it makes perfect sense. Also pretty thrilled with the idea of it being so highly absorbent/non-greasy, how awesome that will be! Truly appreciated.
Hi, I love your recipe! I did not know that mango butter absorbs super quick. I’ve been having a lot of problems with my body butters being sticky. Also I wanted to share that the idea that you can’t combine niacinamide and vitamin c is considered outdated now. Apparently you can. Here’s a link that sort of explains it: https://naturium.com/blogs/ingredient-library-blog/using-niacinamide-and-vitamin-c-together
Author
Sarah-Yes-mango butter imo is the only way to go for body butter. It’s so much better than having to wait for the other butters to absorb1 I did not know this-thank you for leaving the article! Good to know!
Just a question no one has been able to answer for me. Mangoes are related to poison oak, something to which I am VERY allergic! (Just FYI: so are cashews) So, mostly the oil that causes the allergic reaction are in the peel, the bark from the trunk and the juices…..I know mango butter is made from the seed, but I have not been able to try anything made with mango butter to test it out on my skin!!!
Do you know if mango butter will cause allergic reactions?
Author
Carol-I sure don’t-I have heard it’s well tolerated by all skin types but that’s as far as I know. I did not know that mangoes were related to poison oak-that’s so weird! Cashews too!