
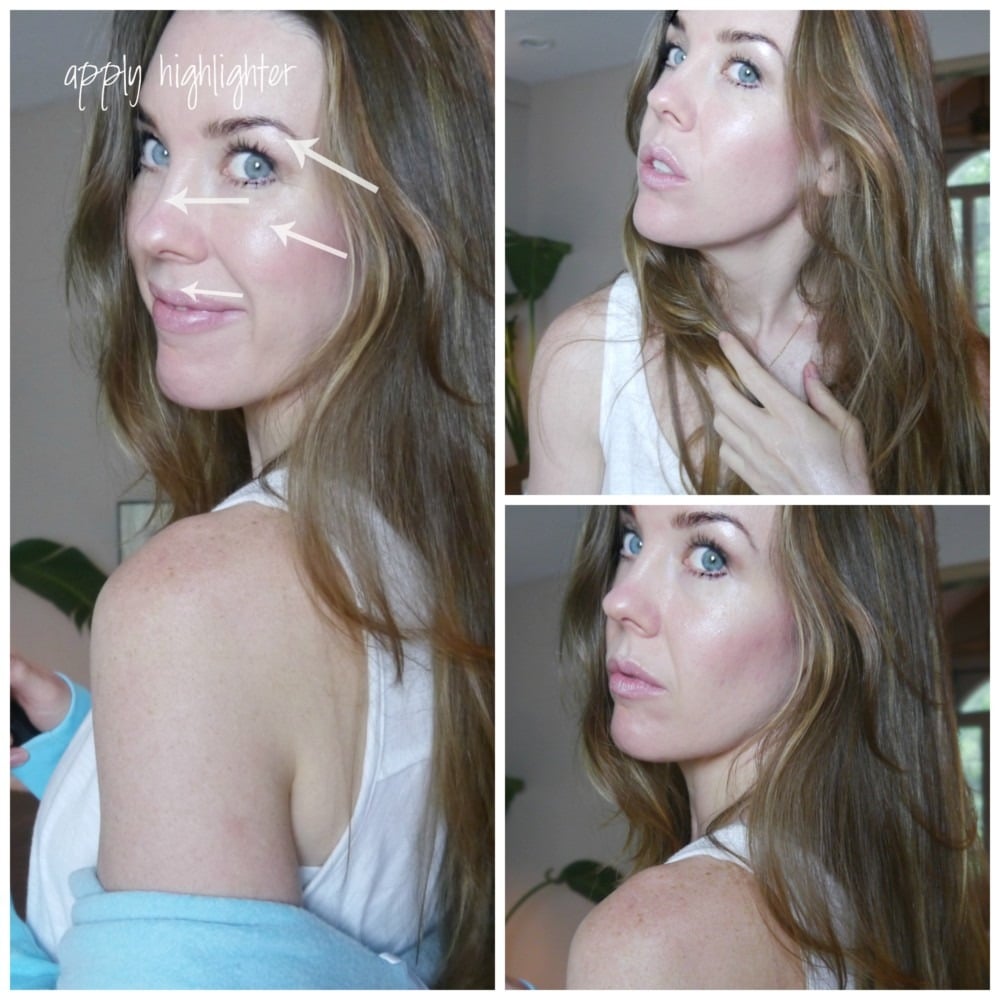
A highlighter is used to bring out certain aspects of the face such as the brow bones and the cheek bones. It can be used in several places-along the cheek bones, below the eye brows, above the upper lip, down the bridge of the nose and on the along the inner corner of the eyes. A highlighter can take you from dull to radiant is seconds.
It’s my go-to when doing even the simplest make up looks. Today I’m sharing one of my favorite makeup DIYs of all times, my DIY highlighter.
I typically leave makeup to the professionals but I have had great success with my DIY mineral makeup recipe and brow gel recipe.
There are several very popular highlighters on the market but the problem is, they are full of potentially harmful ingredients. Since a highlighter is either in a powder form or balm form, I figured it had to be a doable DIY, and I was right! This is one of my favorite DIYs that I use daily!
My daughter had a ballet recital not long ago-dance recitals are one of the few times it’s acceptable to put make up on a 5 year old and I love it! This highlighter worked so well-she was GLOWING, yet still safe with this 3 ingredient recipe!
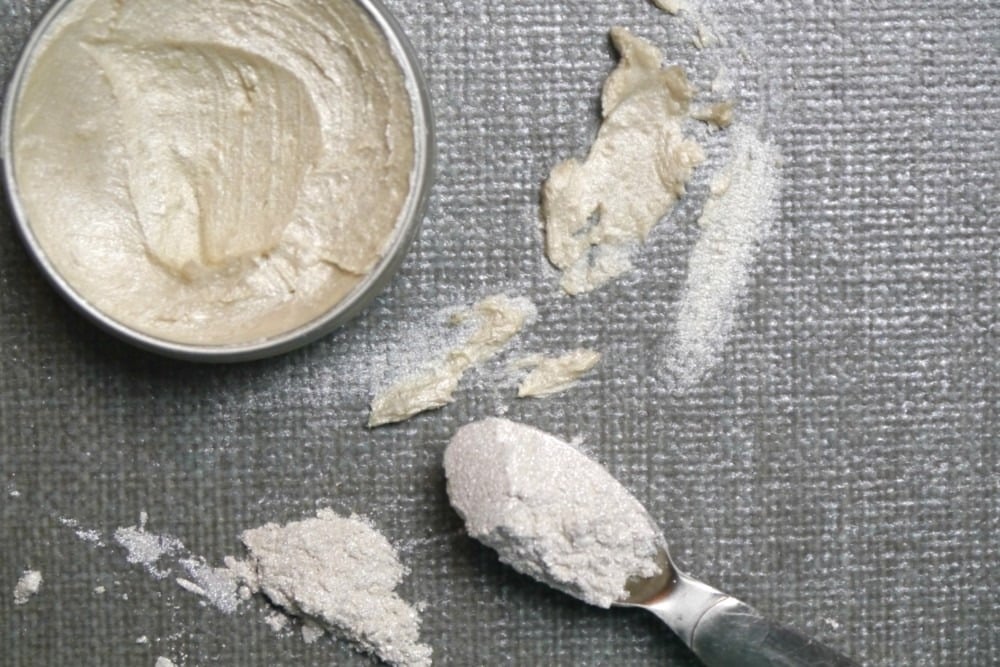
Mica Powder
This DIY highlighter recipe is very similar to a basic lip balm recipe except that I have added white mica powder.
Mica powder is a mineral derived from ground up rocks. It’s the same ingredient that you find in mineral make up. Mica powder is safe for the skin as well as the other ingredients in this recipe!
You can find white mica powder here.
Related Post: DIY Cream Blush and Lip Stain Recipe
DIY Cheek and Brow Highlighter Recipe
- 1 TBSP Sweet Almond Oil (find it HERE)
- 2 tsp. beeswax (find it HERE)
- 1 tsp. white mica powder (find it HERE)
Related Post: Eye Makeup Remover Recipe for Optimal Lash Health
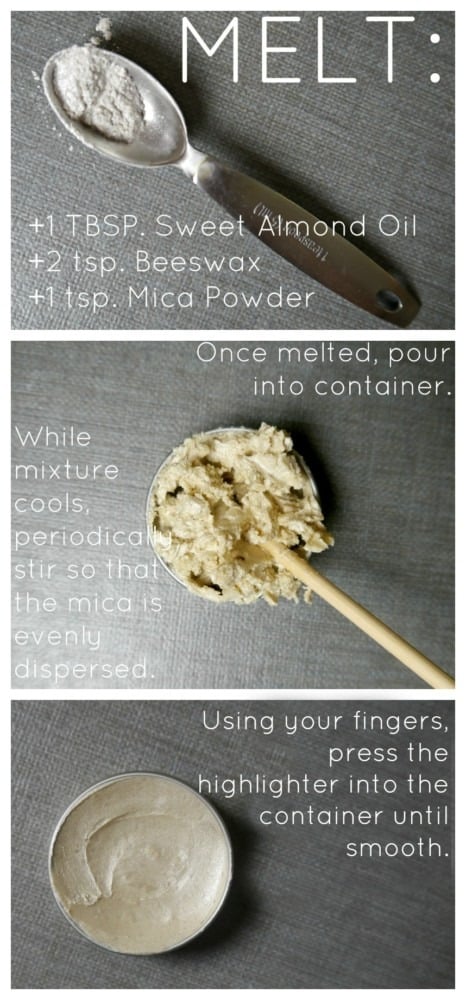
Directions:
- Fill a medium sized pot 1/2 way full with water.
- Place a glass pyrex measuring cup in the pot.
- Combine all ingredients in the glass cup and heat over medium heat until melted.
- Once the ingredients have melted, pour into an open tub or tin.
- Because the mica tends to sink to the bottom during the cooling and hardening process, it is necessary to stir your mixture periodically in order to disperse the mica.
- Once you have thoroughly stirred your highlighter, press the balm into the tin to create a smooth texture.
>I apply this DIY highlighter with my fingers but you could also use a beauty blender or a brush. Either way works!
Find 1 ounce tins HERE.
Related Post: DIY Mineral Makeup
I always use a DIY highlighter on the inner corner of my eyes, it helps to open my eyes as well as gives a fresh, young look. I also include it on my cheek bones and right above my lip-try it if you haven’t-it really does something special for lips! In these pics I also dabbed a little in the middle of my bottom lip to give the illusion of a pout.
Seriously, if you haven’t discovered the magic of a highlighter-today is your lucky day!
For an added boost of radiance, try my DIY makeup setting spray for dewy skin recipe!
xx, Jenni
P.S. Check out my cream blush/lip stain recipe. It’s just like this one but with red mica. It’s another favorite of mine!
PIN IT!!!


Jennifer Phillips worked as a licensed aesthetician for over 8 years before creating the DIY skincare blog, Jenni Raincloud and her natural skin care line, J. Raincloud Organics. Jennifer has been blogging full time for 16 years and loves to gain and share knowledge on how to achieve beautiful skin the natural way.

Was really excited to try this, and I ended up with an overly waxy product.. disappointed. The directions were confusing, I was unsure if I was supposed to add the mica when you say to melt everything and then add it again once it’s cooling or if I was supposed to add it only at the cooling stage. Sad this didn’t work for me 🙁
Author
Jenna-Shoot! I’m sorry the directions were confusing-I find it to be tricky to get it right. It is intended to be wax due to the beeswax. It it were too creamy, it would be too oily sitting on top of your skin. But yes, I added the mica during heating and then I added more once it was cooled while I was mixing it. This is where you have to experiment with how much you need by testing it each time you add mica. To make it harder you can add more beeswax. You can also add more mica anytime and re-heat to re-formulate so you don’t waste your DIY.
What can I do to make this more pigmented?
Author
Bri-Just add extra mica. Are you mixing it as it cools? The mica really settles at the bottom so you have to continuously make sure you are stirring while it hardens so that the mica is suspended in the balm. Otherwise it won’t be a good highlighter at all!
Hi!!!
I was wondering if this would look good on a warm-toned skin? I am sooo psyched to try the recipe, but also worried that the highlighter would look ashy on my warm skin tone…
Would it be better to choose a more yellowy mica color or do you think the white one would work on my skin?
Author
Kiki-I think it would be fine. I have a cooler skin tone but I am somewhat tan in these photos-you can’t tell because I have a photography light on me. I wear it tan or pale so I believe it would look great!
I’m vegan. what could i use to substitute the beeswax?
Author
Hi Ashlee! You can use Candelilla Wax. I talk about it HERE.
Hello! I ordered almond oil but was sent fractionated coconut oil instead (the liquid kind). Can I use that instead of almond oil or should I send it back? Thanks!
Author
Rachel-Fractionated coconut oil will work just fine!!
Does this highlighter work for a dark skinned person?
Author
Joy-I think it would be great are darker skin. If it is not enough, you can always add more mica.
Hi Jenni! I LOVE your blog and just ordered a BUNCH of oils from Spark Naturals and plenty of goodies from Mountain Rose Herbs, too! Quick question about this DIY highlighter- Could I use argan oil instead? My skin responds very well to argan oil…no issues at all- I’ve been using it religiously for years. I was hoping to sub argan oil for sweet almond….thoughts??
Author
Erika-Thank you so much!! I don’t see why you couldn’t! Argan oil is a wonderful oil and usually more effective in anti aging and moisturizing then almond oil. I say go for it!
Hello Jenny, I just made this and it is thick but it seems to be so sparkly instead of shimmery.
I bought the Mica powder on your link. I added some Bronze mica to it. I hope that was ok. But it is still sparkly. Any ideas? Thanks so mcuh
Author
Yolo-Huh…. I’m not sure. Mine is shimmery and pretty subtle. You could try to dilute it with more oil but I don’t know if it would turn down sparkles. I think with mica, it varies batch to batch. Sorry about that!
Hi Jenni
I just discovered your blog with this recipe (thanks Pinterest 🙂 )
Looking at the mica powder ( your link), how many tsp powder do you guess to be in the 1 oz container? I’m trying to determine if the 1oz container is enough for a single recipe or whether I would need to purchase a couple….
Author
Edith-It doesn’t take much mica so I think you’re safe to just get the 1 oz. container. So sorry for my long delay in responding!!
I tried this, mixed it a lot and it was super grainy and too waxy to spread like a creamy highlighter would on skin. Wa yours creamy through and through or chunky? Thanks
Author
Elaina-Mine isn’t. It takes so much mixing and pressing to get the chunks. Did you use the ingredients I linked? I can only vouch for the ingredients I have personally used. Sorry for the issue! I would remelt and see if that might help. Good luck!
I was looking for a recipe with beewax and this is fantastic. You have a new fan!
Author
Yas-Oh good! Thank you!!
I love this so much!! You mention using a powder highlighter if you have oily skin, do you have a recipe for a powder version?
Author
Ashley-Thank you so much! I don’t have a recipe for a powdered highlighter but I’ll look into it!
I was excited to try this, because the reason I want to make DIY highlighter was to avoid Mica. Mica is often mined by under-paid workers in poor countries, and it often has to do with child labor.
Your highlighter looks beautiful. However, I rolled caution to add alcohol (which evaporates) and a preservative to prevent mold and bacteria.
Author
Nicole-Thank you! Because there is no water used in this recipe, a preservative is not needed unless you plan to keep it over 6 mos.